Prominent technology platforms with valuable personal data are increasingly at risk for data breaches from hackers from all over the world. Increasingly, having a secure codebase is top of mind for development teams in industries as wide ranging as Healthcare, Team Collaboration, and Software Management.
Although there are plenty of Rails packages and gems that can handle this for you in a snap, it can be beneficial to have full control over the security over something as important as user authentication in an app. This is especially true if you’re building anything with sensitive data or communication that is best conducted in private.
To practice and learn more about what’s going on behind the scenes with authentication, let’s build a simple chat room that will enable members of a patient’s care team to send and view messages containing sensitive data. Ready to get started?
First, we'll instantiate a new rails application.
rails new diyauthenticationWe'll be using the gem bcrypt to hash our passwords, so that when a user signs up we'll store a hashed version of their password and not the actual string. Add gem 'bcrypt' to the Gemfile, then run bundle install.
Next we'll build our basic User model to get things going, including a name, email, and password_digest. Password digest is just the hashed versions of the user's password, which makes for a handy way to store it in the database.
rails generate model User name:string email:string password_digest:stringrake db:migrateBefore we create a new user, we can add one delightfully useful line of code to our User model, has_secure_password, which will verify the existence of our password upon creation, along with some other helpful validations.
class User < ActiveRecord::Base
  has_secure_password
end
Now we can create a new user in the Rails Console and observe the inputted password get hashed into a securely stored value. Below, I also run the authenticate method on our mock user, proving that we can only return User information by entering in their correct password as an argument to the method.
Next, let's create a users controller that will enable folks to sign up for our site outside of the Rails Console.
rails generate controller Users new createIn that new blank create method in users_controller.rb, we'll instantiate and save a new user if they sign up correctly and pass through the right parameters.
Now that users can be created, we want to ensure they stay signed in while navigating through different pages by creating a session each time they log in. This session will then be destroyed upon logging out or closing the browser.
rails generate controller Sessions new create destroy
In this newly created sessions_controller.rb file, we'll add in our desired functionality
Now we need to add in our routes for these controllers and their respective views before we can finally see the fruits of our labor on the local server. In routes.rb, add:
  get '/login' => 'sessions#new'
  post '/login' => 'sessions#create'
  get '/logout' => 'sessions#destroy'
  get '/signup' => 'users#new'
  post '/users' => 'users#create'
If you used the Rails generator to produce the controllers instead of manually creating the files, you should already have view files, but if not you can always create them. First, we'll create a form_for :user in app/views/new.html.erb.
Our signup form
Additionally, we'll need a corresponding view for returning users to log back in after they close the browser window in app/views/sessions/new.html.erb
Our login form
Although we've built out baseline functionality and it looks like everything is working properly, we haven't built anything that will actually authorize who our user is and restrict access to any of the content, so let's get started on that now. First, in our Application Controller, we'll build a helper method, current_user that we'll define as an instance variable based on the sessions's user id.
  def current_user
    @current_user ||= User.find(session[:user_id]) if session[:user_id]
  end
  helper_method :current_user
Next we'll build a simple authorize method that will redirect to the login page unless there's a user signed in. We'll be able to call this authorize method later on anything we want to restrict access to. Again, in application_controller.rb:
  def authorize
    redirect_to '/login' unless current_user
  end
Using current_user, we can also write a simple conditional statement that will provide a link to login if there's a current user, and links for Sign Up and Log In if there's no current user. We'll put this in application/layout.html.erb
Finally, let's construct some data that we want to secure. Our sample application will contain messages that only signed in users can access, although with the extendable way we've set up our authentication at this point, we could restrict access to any aspects of the app.
rails generate model message title body user_id:integer
rake db:migrate
We'll want to make sure that our associations are properly set up between users and their respective messages. Each message should belong to a specific user, and each user should have many messages. In messages.rb, add:
belongs_to :userAnd in user.rb, don't forget the mirrored relationship on the other side
has_many :messagesThis produces a schema where now we can create a message and figure out which user created it, like so.
Let's also create a messages controller, which is where we can add in our authorize method from the application controller along with some other basic setup code to get things running:
rails generate controller Messages index new create
We're almost there! Let's just update our routes.rb to reflect some new possible views for messages, then we'll have a finished product (for now). In routes.rb, add:
  root 'messages#index'
  get '/messages' => 'messages#index'
  get '/messages/new' => 'messages#new'
  post '/messages/new' => 'messages#create'
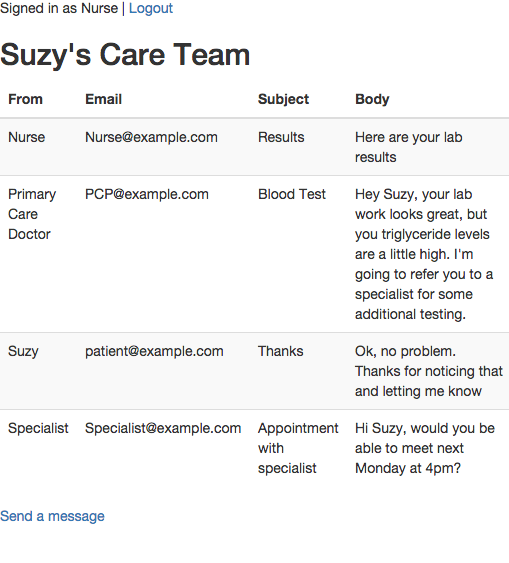
Finally, we need to build out the protected data that we want only signed in users to authorize, in this case our care team's secure message flow. I've put this in app/views/messages/index.html.erb. On the right hand side, you can check out a simple version of the final product (for now)!


